Releases
FrontHub defines an automated workflow following development best practices with constant publications.
Publishing a release
According to FrontHub Lib Flow, the following releases are published:
- Canary: Generated with the label
version:release. - Latest: Generated from main branch.
When a branch is merged with the main branch, its flow in the CI will be triggered. If this Pull Request has the label version:release, it will be checked if the branches with a Pull Request made since the last release have any label that bump a new version, including this Pull Request itself.
For example, if you are doing a hotfix and want your Pull Request to generate a new version, just add the labels: version:patch and version:release. When the branch of this Pull Request is merged with the main branch, the CI will generate the latest version which increments the patch version.
If you wanted to accumulate 3 changes before making the release, for example, follow these steps:
- Make a Pull Request with label
version:patchand merge it. At this time a latest version will not be generated because it does not have the release label. - Make a Pull Request with label
version:minorand merge it. Still the same. - Make a Pull Request with label
version:patchandversion:releaseand merge it. Now a latest version will be generated with the increment of minor version, because "minor" is the highest of the three labels in the semver hierarchy. All 3 changes will be registered inCHANGELOG.md, the 1st and 3rd in the topic🐛 Bug Fix, and the 2nd in the topic🚀 Enhancement.
Manual latest release
If you want to make a latest version from the last merged Pull Request which didn't have the release label, you have two options:
- Find the last Pull Request, add the missing
version:releaseand run again the CI's pipeline. - Create a new Pull Request with the label
version:releaseand merge it.
GitHub, like other services, doesn't allow you to create a Pull Request without at least one commit more than one base branch. To solve this it is necessary to create an extra commit:
git checkout -b empty-release --track origin/main
git commit --allow-empty -m "Release review"
git push origin empty-release
We recommend generating a new Pull Request only if you can't execute the CI pipeline, it will mess up the git log and the CHANGELOG.md unnecessarily, otherwise choose the first simplest approach.
Do not justify the creation of a new pull request with bureaucracy, such as updating some document or something, FrontHub Flow has been stressed as much as possible with all possible flows, any extra step will negatively impact the workflow.
Additional Release notes
Only the Pull Request title is used to compose the Changelog, but you can add more information by adding a Release Notes section in your PR.
# What Changed

A common description of your pull request.

## Release Notes

Hi there! 👋 This text will be included in the Changelog.
This will create a special section at the top of the Changelog that collects all the additional release notes from merged PRs. Below is a sample of what it might look like:
v5.0.0 (Sat May 04 2019)
Release Notes
From #371
Hi there! 👋 This text will be included in the Changelog.
🐛 Bug Fix
- Fix bin config #11 (@megatroom)
Authors: 1
- Bruno Nardini (@megatroom)
Marked as released
Every time a new latest version is generated, automatically the following actions are performed:
- Comments on the merged PR with the new version;
- Comments on closed issues with the new version;
- Adds a
releasedlabel to the pull request; - Adds a
releasedlabel to closed issues;
Warning: Make sure that you create the released label on your project.
This is very important to register the completion of all started discussions. All involved person will be notified by the repository's own notification system, in addition to facilitating future consultations on the subject.
Configuration
You must configure the project exactly as described here to follow FrontHub Lib Flow.
Dependencies
Install the necessary dependencies:
yarn add --dev auto @auto-it/first-time-contributor
Auto configuration
Add in your package.json file the Auto configuration.
For jFrog registry, you need to disable the setRcToken feature:
"plugins": [
  [
    "npm",
    {
      "setRcToken": false
    }
  ],
]
"auto": {
  "plugins": [
    [
      "npm",
      {
        "setRcToken": false
      }
    ],
    "first-time-contributor",
    "released"
  ],
  "onlyPublishWithReleaseLabel": true,
  "labels": [
    {
      "name": "version:major",
      "changelogTitle": "💥 Breaking Change",
      "description": "Increment the major version",
      "releaseType": "major",
      "color": "#C5000B",
      "overwrite": true
    },
    {
      "name": "version:minor",
      "changelogTitle": "🚀 Enhancement",
      "description": "Increment the minor version",
      "releaseType": "minor",
      "color": "#F1A60E",
      "overwrite": true
    },
    {
      "name": "version:patch",
      "changelogTitle": "🐛 Bug Fix",
      "description": "Increment the patch version",
      "releaseType": "patch",
      "color": "#870048",
      "overwrite": true
    },
    {
      "name": "version:performance",
      "changelogTitle": "🏎 Performance",
      "description": "Improve performance of an existing feature",
      "releaseType": "patch",
      "color": "#f4b2d8",
      "overwrite": true
    },
    {
      "name": "version:internal",
      "changelogTitle": "🏠 Internal",
      "description": "Changes only affect the internal API and it doesn't generate a new version",
      "releaseType": "none",
      "color": "#696969",
      "overwrite": true
    },
    {
      "name": "version:docs",
      "changelogTitle": "📝 Documentation",
      "description": "Changes only affect the documentation",
      "releaseType": "none",
      "color": "#cfd3d7",
      "overwrite": true
    },
    {
      "name": "version:dependencies",
      "changelogTitle": "🔩 Dependency Updates",
      "description": "Update one or more dependencies version",
      "releaseType": "none",
      "color": "#8732bc",
      "overwrite": true
    },
    {
      "name": "version:release",
      "description": "Create a release when this pr is merged",
      "releaseType": "release",
      "color": "#007f70",
      "overwrite": true
    }
  ]
}
Now run the following command to automatically generate the labels in your repository, for that you will need to create your personal access token on GitHub:
export GH_TOKEN=xxx
yarn auto create-labels
CI configuration
Create or update your .circleci/config.yml with:
version: 2.1
orbs:
# See the orb documentation here: https://circleci.com/developer/orbs/orb/circleci/node
node: circleci/node@4.1
aliases:
- &circleci_node
- image: cimg/node:15.1
- ¤t_workspace
attach_workspace: { at: '.' }
jobs:
build-and-test:
docker: *circleci_node
steps:
- checkout
- node/install-packages:
pkg-manager: yarn
# Put your test steps here
# - run:
# name: Lint check
# command: yarn lint
# - run:
# name: Run unit tests
# command: yarn test
- run:
name: Build lib
command: yarn build
- persist_to_workspace:
root: '.'
paths:
- 'dist/*'
- 'node_modules/*'
pr-check:
docker: *circleci_node
steps:
- checkout
- *current_workspace
- run:
name: Auto check PR
command: yarn auto pr-check --url $CIRCLE_BUILD_URL
publish-canary:
docker: *circleci_node
steps:
- checkout
- *current_workspace
- run:
name: Publish canary version
command: yarn auto canary --target comment
publish-latest:
docker: *circleci_node
steps:
- checkout
- *current_workspace
- run:
name: Publish latest version
command: yarn auto latest --only-publish-with-release-label
workflows:
build-test-deploy:
jobs:
- build-and-test
- pr-check:
filters:
branches:
ignore:
- main
- next
requires:
- build-and-test
- publish-canary:
filters:
branches:
ignore:
- main
- next
requires:
- pr-check
- publish-latest:
filters:
branches:
only: main
requires:
- build-and-test
Only build on pull requests
In the project configuration in CircleCI, check the option Only build pull requests:

This will allow to push a work in progress to the server without triggering continuous integration unnecessarily.
This also avoids unwanted behavior in the build, since the Pull Request is only created after the push, the build will start without it, so Pull Request validations will fail, so it will always be necessary to run the build again manually.
Git provider configuration
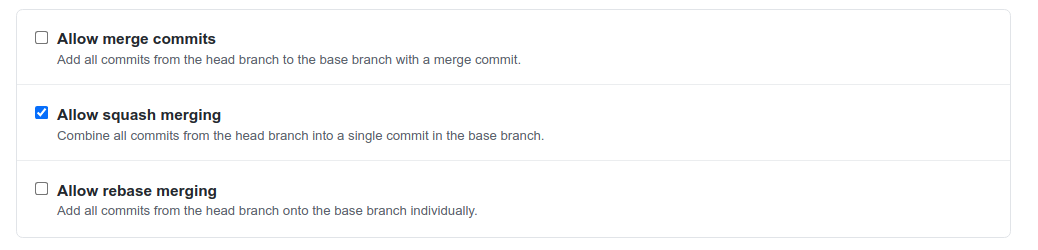
Squash and merge
Change your git provider to allow only squash merging approach. Example in GitHub:
Documentation on how to configure in: